Showing posts with label Thrifting. Show all posts

Saturday, November 5, 2011

Goodwill Hunting: Ugly Frames - Repurposed

What can you do with someone's old, discarded, ugly a** frames?

I have devoted a whole category in Pinterest to reusing old frames.  Check it out for some inspiration if you feel so inclined.

Here is a sample of 3 ugly frames I purchased on a recent Goodwill outing:


Yeah, my favorite is the windmill painting, which was dated 1976.

I actually liked the floral print, just not the dark bamboo-ish frame, & the owl print, but again it was too dark.

Here's a closer look at the windmill painting, just in case you missed it the first time.


Beautiful, huh?  I really picked this one up for the burlap border.

What to do, what to do?

A little paint does magic.

For the windmill painting, I first painted all the wood, even the painting itself with a buff/cream color using craft paint from Michael's, & left the burlap.


It already looks better.

Then I took a lighter creamy off-white & very lightly dry-brushed over the burlap.  I just wanted to freshen the color, not lose the texture of the burlap. This was a very tricky process.

Finally, I took a metallic finish (the same one I used on my pumpkins) & just went over the inside wooden frame with my finger dipped in the paint to give it some shimmer.

For the other 2, I taped off the portions I didn't want painted, & used the buff/cream color again.


And again, I added some of the shimmer paint using my finger around the inner rim of both paintings to give them some shimma-shimma.  I even added some over the owls eyes.

Here they are completed:


See how the metallic gleams in the light?  I love that stuff.

Stay tuned for how I used these in my decor.

Once again, don't pass up an ugly a** frame just because it's ugly, it may turn out to have some potential!

Thursday, October 20, 2011

Halloween Hoopla: Simple Dollar Tree Finds

The Dollar Tree is such a fun place. I mean, really! Especially if you are looking for a few little touches to complete your holiday festiveness. And of course, everything really is $1!  I have gone so crazy in there before, I ended up spending an amount of money that I was embarrassed about...

Anyway, I found this skull head (sorry, I neglected to take a before picture), so here it is after I embellished it with some colored glitter glue that I found there to give it a little extra "sparkle" (3 colors of glitter glue for $1!)

  
I know, there is only so much that can be done with a plastic head - unless you follow the pathway of Martha Stewart & pour glitter on the whole thing... but, I didn't feel like getting messy with the glitter, nor being Martha, so I made due with the glue thing. 

This skull thing fit perfectly in my cake stand, so there it went to sit & stare at me from my buffet.  


Not a very good picture I guess, as it appears to be staring at the ceiling... but really, I swear it was staring at me!  

I also found some little rubbery/plasticky spider things that I shoved in one of my apothecary type jars that I got from Goodwill.  Unfortunately, it didn't come with a lid, but hey, it cost all of 2 bucks (you can also see it behind the skull head above).


I also got another plastic skeleton-man that I pulled apart, let my kids attack with the red glitter glue, & then shoved in another hurricane-type jar. I think the red gives it a nice bloody-like touch.

A few other finds: the crows, cute little spiders & spooky sign, which I hung with ribbon from my favorite upcycled frame that I interchange with whatever-holiday/season-it-happens-to-be decor. 


I also got these 3 glass vases to copy an idea that I found as inspiration while browsing Pinterest, but originally from our friends @ BHG. I think also the cute little ghost candle holder came from there last year, as did the ingredients to make my skull-heads-in-a-jar. Just left it all in there & stored it away. I guess I'm lazy that way. 

Anyway, it's always lots of fun at the Dollar Tree!

Sunday, July 17, 2011

A look back at my spring/Easter mantel (before I take it down...)

Okey-dokey, so spring & Easter are LONG over, but I have missed a few postings due to a lapse in internet connection - hey, it happens to the best of us!  (Actually, I started writing this post about a month ago, but just got around to finishing & actually posting it, so I really took down my Easter mantel before July!  :) )

Anywho, I wanted to post up my mantel I created specifically for spring & Easter - just to say I did it!

Here it is, in all it's glory - adorned with a DIY spring-y wreath:


Below, I'll post a little tutorial about the wreath, which was really simple.

A few close up pictures of the small "vignettes" on each side:


The "left side" is composed of a collection of apothecary-ish jars which I scored from Goodwill.  Click here to see some of my other great finds from my local Goodwill store.  The greenish flower pot holds a bird's nest w/ eggs that I also found from Goodwill.  The other green in the jars are faux "moss rocks" that came from the dollar store (Dollar General, I think). Standing in the background is a frame I found on the side of the road - and, I didn't have to do a thing to it!  I love the rustic finish it has.  (There were actually 2 of them, the "twin" is on the other side - see below).  The various candlesticks were given to me as wedding gifts, & the clock I already had also.   


The "right side" also holds another Goodwill apothecary jar that I scored.  It is filled with those flat glass marble-ish thingys that you fill vases with, & paper mache' eggs I found @ Michael's.  I have seen other posts highlighting how to decorate paper mache' eggs, but I really liked the natural look of them.  Adds great texture & interest.  On the very end are 2 really cute birdies (momma & baby) that I found @ Michael's also & couldn't pass up.  In the back you can see the other twin roadside frame, & also the mates to the other candlesticks.  Take a look back at how I used all of the apothecary jars at Christmas.  

Now for the wreath tutorial, I first took a plain grapevine wreath, & bought one "stalk" of faux green hydrangeas (all from Michael's).  I also picked up some ribbon, a hanging flower ball thing, & a cute sparkly butterfly.  

I pulled the hydrangeas off the plastic stalks to just use the flowers, & hot glued them onto the bottom right-hand side.  I tied the hanging flower ball from the top.  The butterfly was glued to the top left-hand side, which you can see in the finished wreath.  


I attached the finished wreath by hanging w/ green gingham ribbon to my Goodwill repurposed frame that was used during the holidays.  

Here's a close up of it finished (& the undecorated mantel):


Now, I just made a few quick changes for a summer display:


Ta-da!  All bright & summery with some Dollar General Gerber daisies I also had on hand (which I pulled off from the faux stalks).  The graduated candle holders were a Christmas gift, & I filled them w/ grapevine "balls" & topped w/ the flowers.  

Thursday, February 24, 2011

Repurposed Crafty Earring Organization

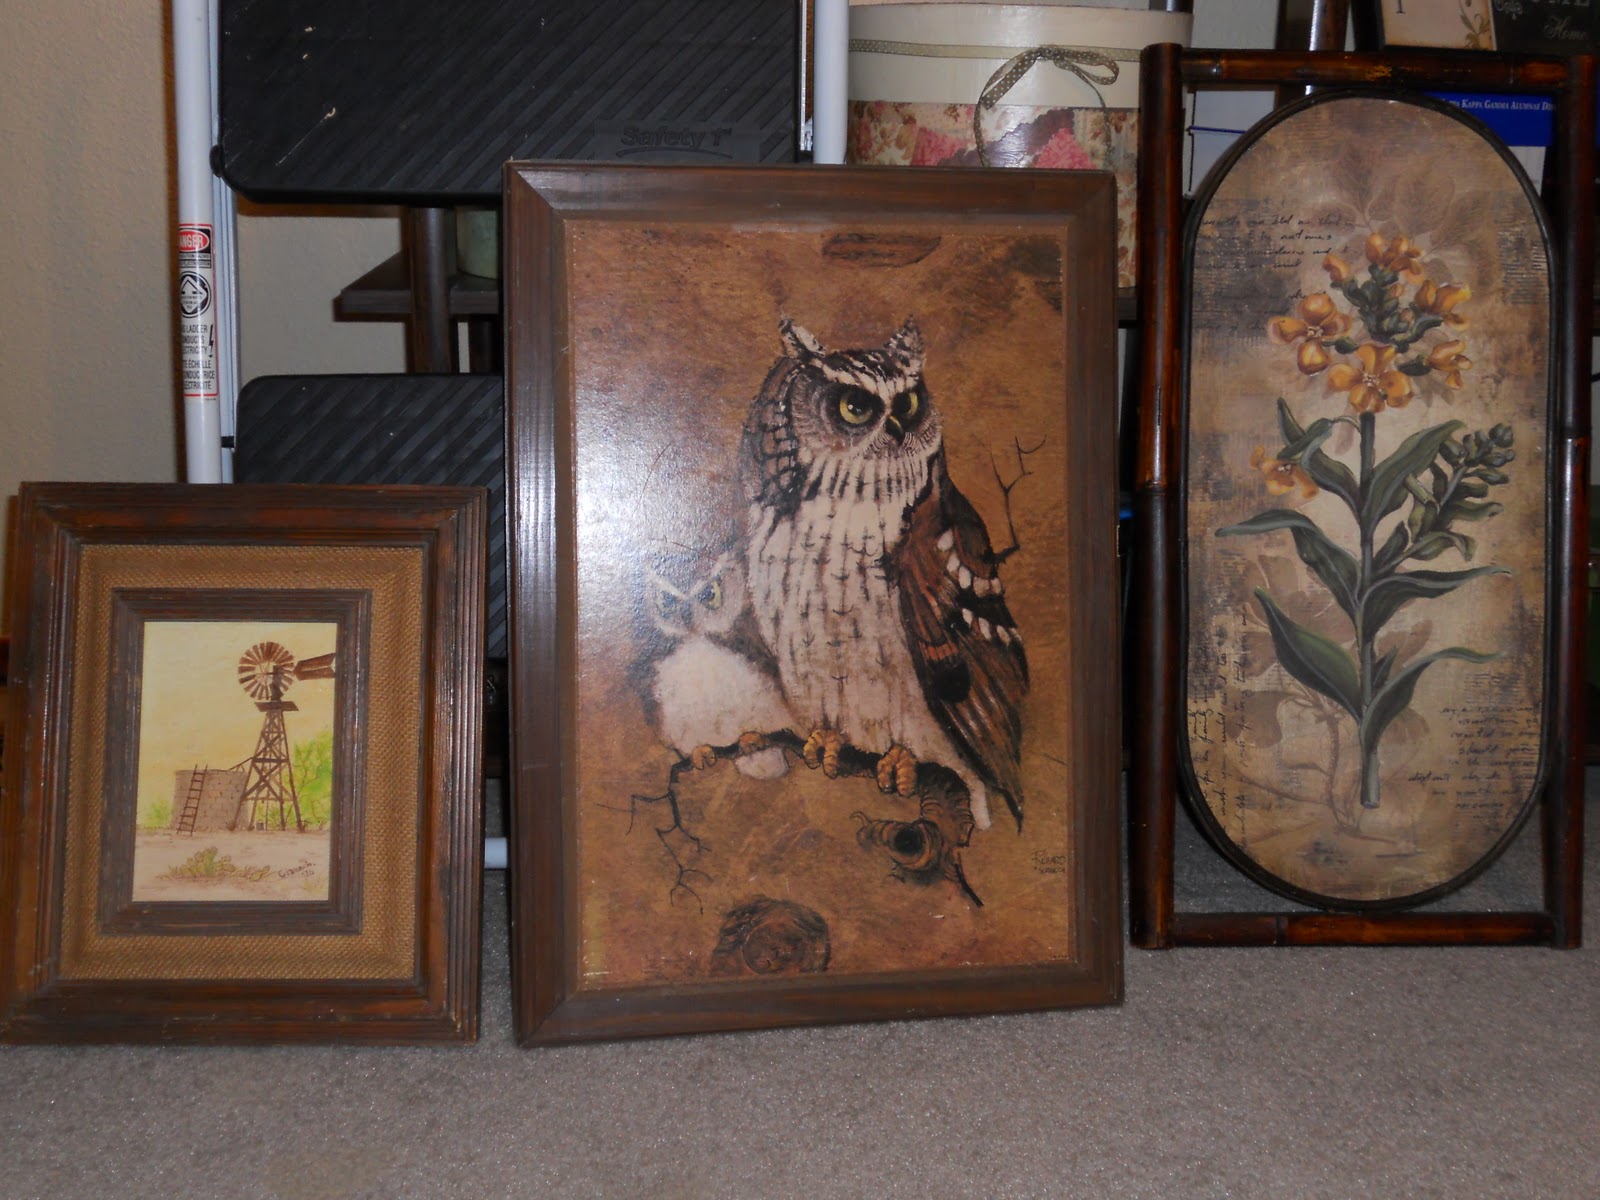
One day while driving down my street, I saw a bunch of frames (without glass) set out by someone's curb for the trashman to pick up.  Well, as I am always looking for hidden treasure, I decided to pick them up. 

I had the frames in my garage for about 6 months before I decided what to do with them.  (Which required a little cleaning up after living for 6 months in my garage, & after being in someone's trash pile).

Here they are before:


The other 2 frames I kept "natural", but the ugly green frames, got a new look with crackle finish.  At the bottom of this post, I showed what I used the blueish frame for.

First, they were painted black, using some latex paint I had left over from a previous kitchen paint project.


By the way, the paint was so old when I opened it, the colors had separated to this:


Weird, huh?  After much stirring, it resumed it's previous black color.

After the black dried, I applied a layer of Weathered Wood to get the crackle finish.


Then, again after drying, I painted the top color, which is a creamy off-white (all craft paint & crackle medium from Michael's).  I did try to keep the brush as dry as possible, so I had a light layer, with the black showing through besides what "cracked":


It starts "cracking" pretty soon after painting, & here it is finished:


Ok, so now that the frames were painted, & nice & dry, I started in with the rest of the project.

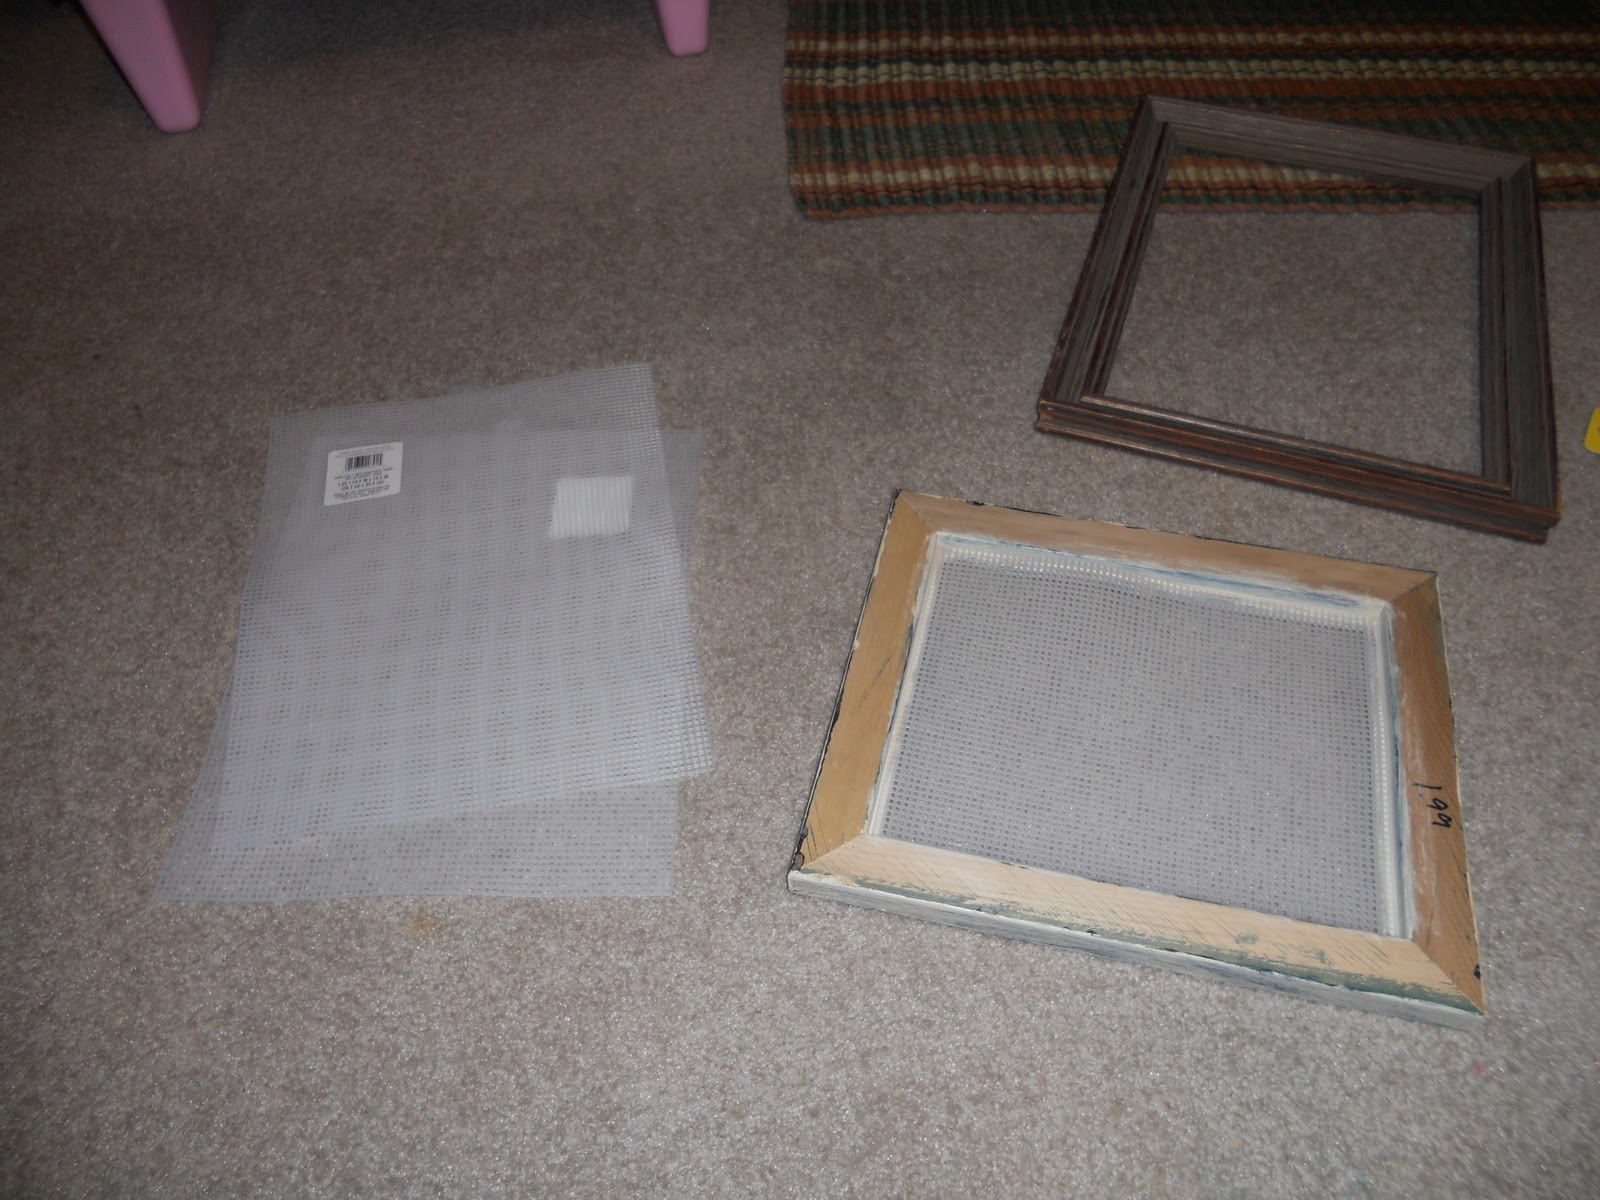
I bought these plastic needlepoint sheets from Michael's for about 99 cents each.  This is what will provide the "framework" to hold my earrings.

First, I cut them down to size to fit on the inside of the back of the frame (within that "lip" that the glass normally would sit on).


Then came the hard part.  How to affix the piece of plastic to the wood frame?

I put a layer of wood glue around the frame & glued down the plastic.  This didn't hold it very snuggly, & some of the plastic started "warping" in areas, so I knew this would not be the end of securing the plastic to the frame.  I let the glue dry first, before proceeding on.

Next, I tried to use small nails hammered into the plastic, but this was challenging because the "lip" was so small, it was difficult to get a good angle to hammer the nail flat.

I ended up deciding to use a staple gun to fasten the plastic.  The staples were so long, that it would not go all the way through (which probably was a good thing since they would have shot through the front of the frame).

You can see below, a close-up of the nail & staples after I only was able to get them part-way attached:


And fully done.  I know it still doesn't look very good, but remember this is the back of the frame.  I then took my hot glue gun & when around the rim to provide another layer of glue attachment.


Both of the frames finished:


And with my earrings on display:


For the other frame I kept "natural", I decided to take a different approach.  For one, the plastic sheets I bought were too small to use on this frame, & also, I needed something that allowed me to hang earrings with different clasps.  The cream frames were good for post or french hook earrings, but not for the ones that have clasps.  I needed something to "hang" them from.

So, I took some hemp twine (used for jewelry making which I got from Michael's), & I fastened 2 pieces horizontally across the frame & secured with the staple gun:


By the way, this frame was much easier to make!

Here it is with my earrings:


I thought it turned out great.

Both of them together:


I am pleased with how they turned out.  But what happened to the other frame that had the bluish tone?

Here it is.  I ended up using it in another project, & you can read the full posting here.


Hope this posting was a source of inspiration for you to look everywhere for treasure, & don't be afraid to find the "rediscovered potential" in everyday objects or even trash!  

Check out this post featured here: (Also visit Sandy's fabulous blog!)


Linking Up to These Parties:


Saturday, February 19, 2011

Inspirational Trip to the Local Antique Mall

Today, I decided to venture to the antique mall in my community.  I just recently discovered it was there (it is on the outskirts of town going the opposite direction). 

With my 2 kids in tow, I went for a visit (they did pretty well, but I think I wore the phrase "don't touch that!" out.  I'm also sure everyone that works in the store & that was shopping there today know both their names). 

This particular "mall" is set up with vendor booths, & has over 100 booths (or at least I read that, I didn't count them).  I did notice a huge difference between the vendors in what items they had displayed, & how they chose to display their items.

My head was spinning & my feet were aching, but I had to check out every-single-booth to see if there were any "treasure" that I needed to take home with me. 

Here is my favorite booth set up: 


I think it looks so yummy cozy.  I wanted to just camp out there.


Here is that hutch on the right hand side up close:


Yes, you will be mine, someday.  I just didn't have the $300 bucks to drop on it today. 

Actually, their prices were very reasonable, in terms of antiques.  Most of the furniture pieces were $300 or less, & they were having a "madness sale", so many vendor's booths had discounts, some up to 50%!  However, usually the custom painted pieces were higher, & although I could easily do this myself, it's nice to have it already done! 


Here is a piece that I could paint up, but it wasn't as big as I would like:


I do love the cottage-y look it has. 


This is an adorable piece for a little girl's room, but again, not only was it up there in terms of price, but I don't think I even have a corner to put it in my daughter's room.


This buffet WAS very inexpensive (less than $200, I think), & it would look awesome with a paint job:


Hmmmm, maybe I will keep that one in mind...


Another cute little corner set up:


but boo-hoo, this one was "for display only".  Really?


I found some great chandelier's: 


Some actually pretty vintage.  Here is the one I ended up getting to go over my dining room table:


I couldn't get a great picture of it, but it has teacups!  I thought that was so unique.  The only problem, is that it will hold only 1 bulb now, but for $25, that's cool with me.


I saw lots of stained glass "windows"- here's 2 I liked:


And of course, my favorite, owls:


I took these bookends home for only $7!


Can't forget the vintage potato sacks.  I will be thinking about what I could do with these... pillows maybe?  I don't know.  They were kind of pricey @ $20 a sack.


Lots of great old doors w/ chippy paint:


This is a cabinet made out of old shutters (Love it!):


Cool old crates & bottles:


I thought this was a great idea, weaving old neck ties to make the seat on a chair!  Brilliant!


This booth also had one in white with gold-toned neck ties (you can see it barely on the left).


As you can see, I had a great time.  I definitely plan to go back for more, & got some great ideas!